


This is the second part of a two part series on Microsoft Exchange 2010. In the first article we examined the changes and enhancements in Exchange 2010. This time we’ll walk through the steps required to install a fully functional Exchange 2010 server on Windows Server 2008 R2.
System Requirements
First, you need to make sure that your Active Directory (AD) environment and your Exchange server meet the minimum requirements:
- AD forest functional level is Windows Server 2003 (or higher)
- AD Schema Master is running Windows Server 2003 w/SP1 or later
- Full installation of Windows Server 2008 w/SP2 or later OR Windows Server 2008 R2 for the Exchange server itself
- Exchange server is joined to the domain (except for the Edge Transport server role)
Prerequisites
In this example we are going to install Exchange 2010 on a Windows Server 2008 R2 operating system. Before installing Exchange we need to install some Windows components. It’s important that you don’t miss anything here because the Exchange 2010 installer does not provide very good feedback if Server 2008 R2 is missing required components.
- Install the 2007 Office System Converter: Microsoft Filter Pack
- Add the appropriate Windows components/features
- Open PowerShell via the icon on the task bar or Start >> All Programs >> Accessories >> Windows PowerShell >> Windows PowerShell. Be sure that PowerShell opened with an account that has rights to install Windows components/features.
- Run the following command:
Import-Module ServerManager - For a typical install with the Client Access, Hub Transport, and Mailbox roles run the following command:
Add-WindowsFeature NET-Framework,RSAT-ADDS,Web-Server,Web-Basic-Auth,Web-Windows-Auth,Web-Metabase,Web-Net-Ext,Web-Lgcy-Mgmt-Console,WAS-Process-Model,RSAT-Web-Server,Web-ISAPI-Ext,Web-Digest-Auth,Web-Dyn-Compression,NET-HTTP-Activation,RPC-Over-HTTP-Proxy -Restart. For a full matrix of the required Windows components with regards to the Exchange server roles see: http://technet.microsoft.com/en-us/library/bb691354.aspx#WS08R2
- If your Exchange server will have the Client Access Server role set the Net.Tcp Port Sharing Service to start automatically
- Open PowerShell via the icon on the task bar or Start >> All Programs >> Accessories >> Windows PowerShell >> Windows PowerShell. Be sure that PowerShell opened with an account that has rights to modify service startup settings.
- Run the following command:
Set-Service NetTcpPortSharing -StartupType Automatic
Exchange 2010 Installation
Now we’re ready to run the Exchange 2010 installer. We’ll go through a typical installation that includes the Client Access, Hub Transport, and Mailbox roles. This is what you will want to install if you are only going to be running one Exchange server. If you scale out your Exchange architecture with multiple servers then you will want to familiarize yourself with the Exchange server roles for a proper deployment.
- Logon to the desktop of your soon to be Exchange server with a Domain Admin account.
- Run setup from the Exchange 2010 media.
- Click on “Step 3: Choose Exchange language option” and choose one of the options (Install only languages from the DVD will be fine in most cases).
- Click on “Step 4: Install Microsoft Exchange.”
- Click Next at the Introduction page.
- Accept the license terms and click Next.
- Make a selection on the Error Reporting page and click Next.
- Stick with the default “Typical Exchange Server Installation” and click Next.
- Choose a name for your Exchange Organization and click Next.
- Make a selection on the Client Settings page and click Next.
- If you want your Exchange server to be available externally then choose a domain name such as mail.myorganization.com, click Next.
- Make a selection on the Customer Experience Improvement Program page and click Next.
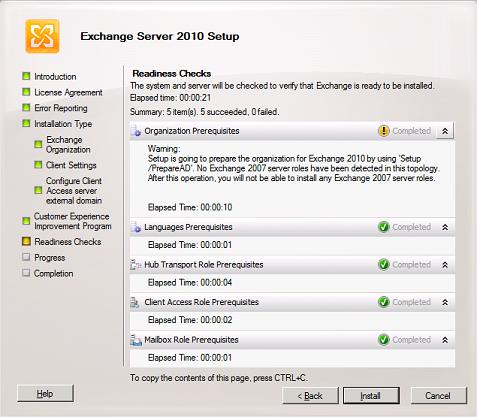
- If all the prerequisites are there then you can click Install.
- Grab a cup of coffee or take a walk while the installation process does its thing.
- When the installation has finished go back to the Exchange installation page click on “Step 5: Get critical updates for Microsoft Exchange.”
- Install Microsoft Update (if necessary) so that Windows update will check for non-OS updates, and verify that there are no Exchange updates.
Post Installation Steps
Now that you have Exchange 2010 installed, you will need to do some basic configuration in the Exchange Management console to get mail flowing to/from your server.
- Open the Exchange Management Console via Start >> All Programs >> Microsoft Exchange Server 2010 >> Exchange Management Console
- Expand Microsoft Exchange On-Premises so you can see: Organization Configuration, Server Configuration, Recipient Configuration, and Toolbox
- Under Organization Configuration >> Hub Transport >> Accepted Domains add a new Accepted Domain for the domain you wish to use for email addresses. For example, your AD domain will be listed by default (i.e. ad.myorganization.com). You will probably want to add “myorganization.com” as an Authoritative Domain.
- Under Organization Configuration >> Hub Transport >> Send Connectors >> New Send Connector … >> Pick a name such as “MyOrganization Internet Send Connector” >> change the drop down to “Internet” >> Next >> Add … >> enter “*” in the Address field and check the box to include all subdomains >> OK >> Next. Now, if you want your Exchange server to route mail directly, then click Next on the Network setting page, but if you want to route your email through an upstream provider then select “Route mail through the following smart hosts” and Add … a mail gateway such as smtp.comcast.net. Click Next >> Next >> Next >> New
- Under Server Configuration >> Hub Transport >> Right-click Default *** >> Properties >> Permission Groups tab, check the box for Anonymous users. This will allow your Exchange server to accept incoming mail delivery from remote mail servers.
- Under Recipient Configuration >> Mailbox, create mailboxes for your existing AD users (or create a new user & mailbox)
- New Mailbox … >> select User Mailbox >> Next >> Existing users >> Add … >> select an existing AD account >> OK >> Next >> specify an alias (e.g. the AD user name) >> Next >> New
- If you want to use an SSL certificate for Outlook Web App, IMAP, POP, etc. click on Server Configuration and import or create the certificate
Mail Routing Configuration
Now the final piece you need to configure to receive mail is your external DNS records. The method for configuring your DNS records will depend on whether you host your own DNS or have a provider that hosts it for you. Either way you will need to create an “A” record that points mail.myorganization.com to the IP address of your mail server, and an “MX” record that points myorganization.com to mail.myorganization.com. You will also want to make sure that port 25 is open both inbound and outbound to your Exchange server.
Conclusion
That’s it! You should now be able to browse to https://mail.myorganization.com/owa (or https://localhost/owa from the server) and logon via the Web interface to send and receive mail!