Have you ever wished that you could know exactly what’s going on on your network? If so, the tool of choice is often a protocol analyzer. A protocol analyzer can help you to see if your encryption is working correctly, or if a particular PC is flooding the network with bad packets. Many times, though, protocol analyzers can be difficult to use. Many commercial protocol analyzers are also very expensive. Fortunately, though, a protocol analyzer is included with Windows 2000. In this article, I’ll introduce you to this protocol analyzer and show you how to use it to perform some common tasks; at the end of the article, I’ll walk you through an example.
Installation
Although Network Monitor is a part of Windows 2000, it isn’t installed by default. To install Network Monitor, follow these steps:
- Load the Windows 2000 CD. Open Control Panel and double-click on the Add/Remove Programs icon. In the Add/Remove programs dialog box, click the Add/Remove Windows Components button. The Windows Components Wizard will appear.
- Select Management and Monitoring Tools (the words, not the check box) from the Components dropdown list and click the Details button.
- In the resulting screen, select the Network Monitor Tools check box and click OK. When you do, Windows will return you to the main wizard screen.
- Click Next, and Windows will begin to copy the necessary files. When the copy process completes, click Finish and close the Add/Remove Programs dialog box.
Basic operation
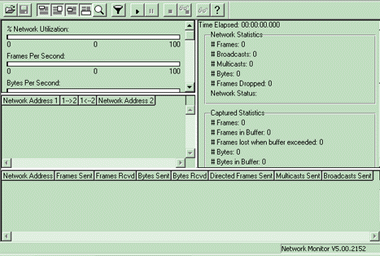
To access the Network Monitor, choose Start|Programs|Administrative Tools|Network Monitor. When you do, Network Monitor will open and display a message telling you to select the network from which you want to capture data. Click OK to acknowledge the message. At this point, you’ll see a list of all of the NIC cards installed in the server. Select the NIC card that’s connected to the network that you want to monitor and click OK. You’ll now see the main Network Monitor screen, as shown in Figure 1.
 |
Using Network Monitor to spot security issues
One of the most important uses of Network Monitor is spotting security problems. For example, you can monitor packets to see if encryption or compression is working correctly. Needless to say, if either of these two security features is supposed to be in place but isn’t working, your data could easily be compromised.
To test the security of your data, follow these steps:
- Select a PC to run the test on. Select the Filter command from the Network Monitor’s Capture menu. You’ll see a message indicating that for security reasons, this version of Network Monitor can only capture packets sent to and from the computer that’s running the Network Monitor program. (If you need the full-featured version, it’s available in SMS Server.) Click OK.
- The Capture Filter dialog box will open. This dialog box allows you to filter messages based on address or on a specific pattern. On my test network, I chose to use the filter because the server in use is constantly being bombarded by requests from other computers. However, depending on your own specific environment and needs, you may choose whether using the filter is appropriate.
- Once you’ve set the filter, select the Capture|Start to begin the process of capturing packets as they pass through the server.
- Try opening an e-mail message or something else containing confidential data. After you’ve done so, switch back to the Network Monitor and stop the capture by clicking the Stop button on the tool bar.
Now that you’ve captured some packets, it’s time to look at them. To do so, select Capture|Display Captured Data. When you do, you’ll see a screen containing a summary of the captured data.
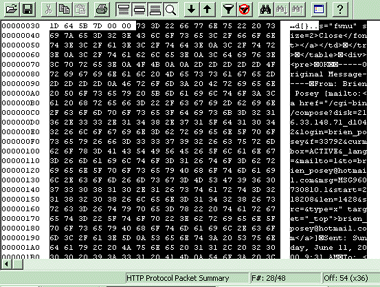
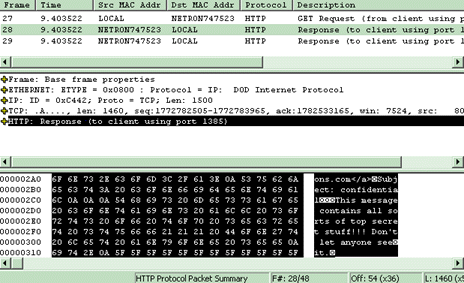
Toggle on all three display panes by selecting the appropriate options from the toolbar. Select the first frame from the Summary pane; the details of the frame and its contents appear in the panes below. Click the Down arrow on the toolbar to move to the next captured packet. As you can see in Figure 2, it doesn’t take long to find something interesting if your packets aren’t encrypted. If you see something notable, you can select the pane that it resides in and click the magnifying glass icon to temporarily enlarge the pane for a closer look. As you can see in Figure 3, you can view everything from the code behind a Web site to the contents of an e-mail message.
 |
 |
Is Network Monitor a threat to security?
As you can see, Network Monitor can be used to determine just how secure or insecure your data really is. However, as you can imagine, in the wrong hands, Network Monitor itself can be a threat to security. Fortunately, Microsoft realizes this and built precautions into the software. To test to see if someone else is running Network Monitor, simply close the current window, which should still be displaying captured data. Next, select Tools|Identify Network Monitor Users command from the Tools menu. When you do, you’ll see a list of users running Network Monitor. Keep in mind, though, that the limited version is only capable of spotting users on PCs that have direct communications with the computer on which you’re running Network Monitor–if the other machine is across a switch or router, then you won’t be able to see it.
Internet security
As you probably already know, TCP/IP isn’t simply a single protocol. Rather, it’s an entire suite of protocols. Each of these protocols functions across a specific TCP/IP port. Many times, when a hacker wants to break into your network from the outside world, he will do so by using one of these free ports. The purpose of a firewall is to close all the ports except the ones you regularly use. For example, HTTP traffic travels through port 80, so you’d want to leave port 80 open. However, port 81 isn’t frequently used, so you’d want to close it.
Even after closing the ports that aren’t frequently used, you’re probably curious to know if your firewall is really working and if anyone is trying to use any of the restricted ports or protocols. Network Monitor makes it easy to find out. To do so, begin by capturing data over whatever time span that you think is appropriate. When you’re done, stop the capturing and view the captured data. Click on the icon on the toolbar that looks like a set of binoculars.
At this point, you’ll see the Find Frame Expression properties sheet. This property sheet allows you to search for many different types of packets and communications. For example, if you select the Address tab, you can search for communications between any two stations that you specify. You can even search on the direction of the communication. Thus you could search for all packets that station B sent to station A.
The Property tab lets you search for either the existence of any of the protocols that I mentioned earlier or a specific protocol that contains a specified value. You can indicate the value in either ASCII or HEX form. For example, you could search for any HTTP packets that contain the ASCII text CONFIDENTIAL. You could also check for the existence of packets sent in any of the more obscure protocols that a hacker might use to break in.
If you’re merely trying to test for the existence of unauthorized protocols, there’s an easier way of doing so. Begin by going to the Protocol tab and disabling all the common protocols that you know exist on the network. Doing so leaves only the obscure protocols enabled. Click OK to close the property sheet. When you return to the screen containing the captured data, all the packets will still be displayed. However, you can use the icons on the toolbar that contain pictures of binoculars with arrows beside them to navigate to the previous and next occurrence of the selected protocol. For example, if you search on the HTTP protocol, the first occurrence of HTTP within the captured data will be selected. You can then click the icon with the binoculars and the down arrow to move to the next occurrence.
A crash course in Network Monitor
After reading the article to this point, you’ve no doubt discovered that Network Monitor can be a bit intimidating, to say the least. So, I decided to take this opportunity to walk you through a simple exercise that you can use to gain familiarity with the program. Before you begin, you should already have installed the Network Monitor program. In this exercise, I will be asking you to send an e-mail message. For this particular task, you should use a Hotmail account, because it doesn’t encrypt e-mail. If you don’t already have a Hotmail account, you can set one up for free at www.hotmail.com. To prepare for this exercise, you should also send several test messages from your normal e-mail account to your Hotmail account.
Now, follow these steps:
- Go to the machine from which you’ll be sending the test message. Record this computer’s machine name and current IP address for reference purposes. It’s important to point out that you shouldn’t be using the machine that’s directly tied to your Internet connection (if such a machine exists), or you won’t capture anything.
- Go to the server and open the Network Monitor program. At the Network Monitor console, select Capture|Start to begin the capture process.
- Go to the machine from which you’ll be using Hotmail and open the test messages that you sent earlier. After doing so, return to the machine running Network Monitor and select Capture|Stop.
Now that you’ve captured some data, it’s time to take a look at what you’ve got. One of the easiest ways to do so is to pick a keyword from one of the e-mail messages you opened and search for it. Follow these steps:
- Click on the icon that resembles a set of binoculars to open the Find Frame Expression properties sheet.
- Select the Property tab and locate the HTTP property. (We’re using HTTP because Hotmail functions via the HTTP protocol.) Click the plus sign beside HTTP to expand the choices beneath it.
- Select the Data option beneath HTTP. Select Contains under the Relation field and select the ASCII radio button at the bottom of the window.
- Enter your keyword in the Value (Array of Bytes) field and click OK. The search routine will attempt to locate the key word you’ve specified.
Depending on the frame from which you started the search process, you may or may not locate the word that you were searching for. If you don’t find it, try using the icons that contain a set of binoculars next to an up or down arrow. These icons are designed to find the next occurrence of the search criteria moving either up or down through the list of captured packets. //
Brien M. Posey is an MCSE who works as a freelance writer. His past experience includes working as the Director of Information Systems for a national chain of health care facilities and as a network engineer for the Department of Defense. Because of the extremely high volume of e-mail that Brien receives, it’s impossible for him to respond to every message, although he does read them all.


