So far in this series, I’ve worked through the basics of auditing. However, I haven’t yet covered two main areas: auditing the Active Directory and reviewing the audit logs. In this article, I’ll discuss these topics.
Auditing the Active Directory
Before you can audit an Active Directory object, you must enable Active Directory auditing. To do so, follow these steps:
- Go into Active Directory Users and Computers and right-click on your domain name. Select Properties from the resulting context menu.
- In the domain’s properties sheet, select the Group Policy tab. Select the group policy to which you want to apply auditing, and click Edit. Windows 2000 will open the Group Policy console.
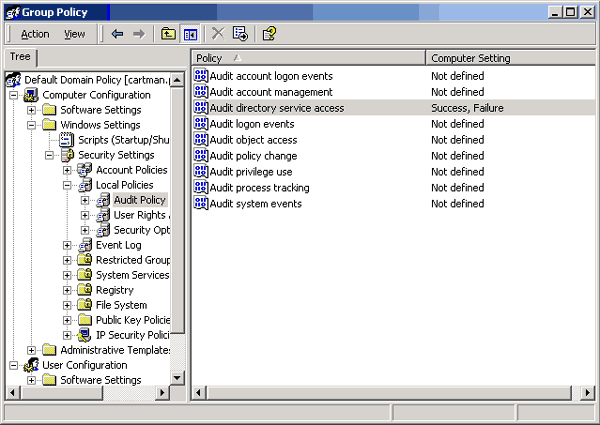
- Navigate through the Group Policy Console’s tree to Domain Controller Policy | Computer Configuration | Windows Settings | Security Settings | Local Policies | Audit Policy. When you select the Audit Policy object, various types of auditing will be displayed in the column to the right.
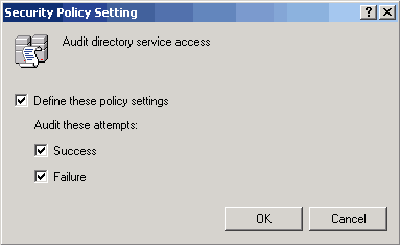
- Double-click on Active Directory Service Access. The Security Policy Setting dialog box will open, as shown in Figure 1. Select the Define These Policy Settings check box, followed by the Success and/or Failure check boxes, and click OK.
Figure 1: Select the Define These Policy Settings check box followed by the Success and/or Failure check boxes. - Windows will return you to the Group Policy console. You’ll see that Directory Service Access auditing has been enabled, as shown in Figure 2.
 |
Once you’ve enabled directory service auditing, you’re free to close the Active Directory Users and Computers console and all of the consoles and windows you’ve opened through it. It’s now time to begin the audit process. To do so, follow these steps:
- Open any Active Directory-related console (except Active Directory Users and Computers). For the purposes of my examples, I’ll be using the Active Directory Sites and Services console.
- Right-click on an object you want to audit, and select Properties from the resulting context menu.
- In the object’s properties sheet, select the Security tab and click the Advanced button. The object’s Access Control Settings properties sheet will open.
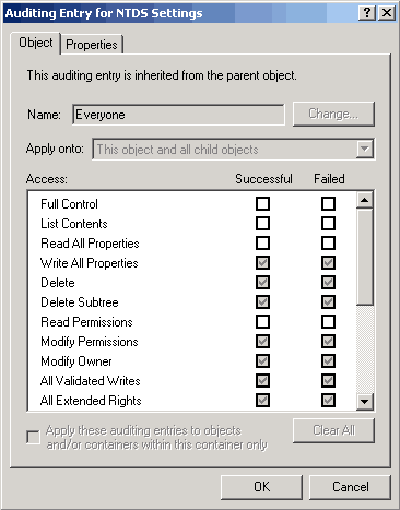
- Select the Auditing tab. You can use the Add and Remove buttons to determine which groups or users should be audited. You can also select a user or group and click the View/Edit button to see an Auditing Entry dialog box similar to the one shown in Figure 3; this dialog box lets you determine exactly which aspects of the object should be audited for the selected user or group.
Figure 3: The Auditing Entry dialog box lets you decide what should be audited on a per-user basis
Reviewing the Audit Logs
The final step in the auditing process is to review your audit logs. I strongly recommend making this a daily process. For example, I make it a point to review my audit logs every morning, right after I change my backup tapes.
To review an audit log, select Start | Programs | Administrative Tools | Event Viewer. When the Event Viewer console opens, you’ll see a list of all of the existing log files. Select the Security Log to see the results of your auditing.
As you browse through the list for the first time, you may discover that you’ve audited too many events to be meaningful. However, you can use this as a learning experience. By looking through the audit logs, you can get a feel for whether any of the currently audited events shouldn’t be audited. I recommend auditing as few events as practical, for two reasons: First, the more events that you audit, the harder it is to locate a specific event in the log file; second, each event that you audit consumes system resources, such as processing power, disk space, and memory.
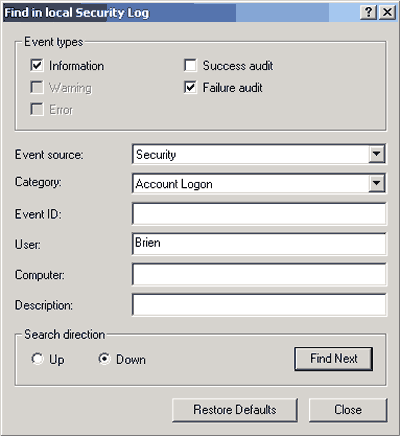
Even if you’ve been very selective about which events you audit, you may have trouble finding exactly the event you’re looking for. Fortunately, you can use a search to make this process easier. To do so, select the Security Log and then select the Find command from the Event Viewer’s View Menu. The Find In Local Security Log dialog box will open, as shown in Figure 4. This dialog box lets you perform a targeted search on a number of criteria. For example, you can search for information, warnings, or errors. You can further search by specifying whether you’re looking for a success audit or a failure audit. Finally, you can search for things like event source, category, event ID, user, computer, or description.
Figure 4: The Find In Local Security Log dialog box lets you perform a targeted search. When you find a specific event in the audit log, keep in mind that the information presented to you is merely a summary of the event that has occurred. You can view more detailed information on any event by double-clicking on it.
Conclusion
As you can see, the auditing process is a very important part of your network’s security. In this article series, I’ve walked you through the process of implementing various types of auditing. I’ve also shown you how to locate specific events within the audit logs. //
Brien M. Posey is an MCSE who works as a freelance writer. His past experience includes working as the director of information systems for a national chain of health care facilities and as a network engineer for the Department of Defense. Because of the extremely high volume of e-mail that Brien receives, it’s impossible for him to respond to every message, although he does read them all.


