NetMeeting 3.0, from Redmond, Wash.-based Microsoft Corp., has many useful features, but one of the most impressive is Remote Desktop Sharing. This tool can help you administer your network or use applications remotely: If a remote user has a computer problem, you can access that computer and then fix the problem as the user watches. NetMeeting also may save you a drive to the office to fix a server problem. And, you can use files and programs on your office computer while you are at another location. In this article, we’ll show you how you can access and use one computer from another by sharing the desktop.
Installing NetMeeting
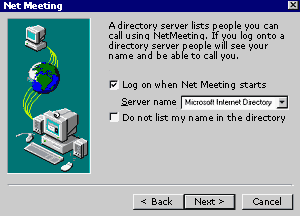
You can download the NetMeeting software free from Microsoft. The installation is straightforward, but you must decide whether you want to log on to a directory server when NetMeeting starts, shown in Figure 1. If you choose to log on to a directory server, others will be able to see your name–a situation that may open the door to unsolicited callers. Once the program is installed, you can launch it, and finish the configuration.
 |
Activating remote desktop sharing
Before you can use Remote Desktop Sharing, you must activate it in NetMeeting. Remote Desktop Sharing will not work if NetMeeting is running on the computer. To set up Remote Desktop Sharing, do the following:
- Launch NetMeeting.
- Choose Tools|Enable Sharing and follow the instructions on screen.
- Reboot your computer.
- After your computer restarts, launch NetMeeting.
- Choose Tools|Remote Desktop Sharing and follow the instructions on screen. I highly recommend that you enable a password-protected screen saver when prompted.
- Close NetMeeting.
A NetMeeting Remote Desktop Sharing icon now appears in your system tray. Right-click the icon and choose Activate Remote Desktop Sharing.
On Windows NT, NetMeeting runs as a service, which allows you to log off and still have access. This ability is important in case a server loses power and has to reboot. Once it comes back up, you can log in remotely using NetMeeting to perform maintenance.
Running a remote session
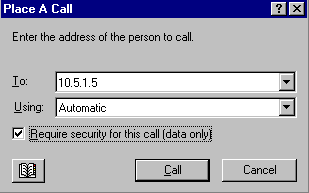
To access a computer remotely using NetMeeting, do the following:
 |
Ending a remote session
Before you end a session, be sure to either log off or lock the screen. You may want to set up a password screen saver on remote computers, in case you forget to log off or lock the screen–NetMeeting will start the password screen saver as soon as you hang up. (NetMeeting also starts your password-protected screen saver if anyone tries to use the computer while it is being accessed.)
To end Remote Desktop Sharing session, choose Call|Hang Up or click the hang-up icon on the NetMeeting screen.
Changing a remote desktop sharing password
To change a Remote Desktop Sharing password, do the following:
The “Change Password” button appears only on computers using Windows 95 or Windows 98. For computers using Windows NT 4.0, administrators can provide Remote Desktop Sharing to users without giving them administrative privilege accounts by creating a user group account with a specific name and then adding users to the group. //
Troy Thompson, MCSE+Internet, is a freelance consultant in the Louisville, Ky., area.


